そろそろCentOS7にしてみようかなと思った。
(注:結果としてはアップグレードは失敗し、クリーンインストールすることにしました。
★追記:この記事へのコメントで「openscapをバージョンダウンさせたらエラーがなくなりました」と教えてもらえました。自分でも後で試そうと思います。)
「Pre-Upgradeツール」てのが必要なんでしたっけ、と見に行ったら--
Upgrade CentOS 6 to CentOS 7 Note: This is not the most highly recommended method to move from CentOS 6 to CentOS 7 ... but it can be performed, at your own risk, if the tool says the risk is Slight or None. We would NEVER recommend using this method with any Medium, High or Extreme issues present.
「ここで説明する方法でアップグレードするのはお奨めしない。自己責任でやるならどうぞ。大事なシステムではやめとくように」とな。そして
DO NOT USE this tool. Warning: use of this tool is currently BROKEN as several system-critical packages are of a higher version number in CentOS 6.7 than they are in CentOS 7 so those do not get upgraded correctly. This renders yum and several other system tools non-functional.
「このツールは現在壊れています。幾つかのシステムクリティカルなパッケージにおいて、CentOS7よりCentOS6.7の方がバージョンが高いものがあり、そのためアップグレードはうまくいきません。Yumとかが機能しないよってことです」という感じのことが書かれてるようです。
確かに6.5→7へのアップデートしてる人は見つかるけど、「How to upgrade "CentOS6.8" to CentOS7」「Centos 7 from 6.8」とかで検索しても出てこない。クリーンインストールしろってことかな。
とは言ったってやってみればできるんじゃないの。と無理やりやってみた。
https://wiki.centos.org/TipsAndTricks/CentOSUpgradeTool
Create a Repo file in /etc/yum.repos.d/, named something like upgradetool.repo
Add the following lines to the repo file:
$ vi /etc/yum.repos.d/upgradetool.repo

[upg]
name=CentOS-$releasever - Upgrade Tool
baseurl=http://dev.centos.org/centos/6/upg/x86_64/
gpgcheck=1
enabled=1
gpgkey=file:///etc/pki/rpm-gpg/RPM-GPG-KEY-CentOS-6
This command will then get the RPMs installed to run an upgrade:
$ yum install redhat-upgrade-tool preupgrade-assistant-contents
完了しました!
ここまでOK。続けて
- Preupgrade Assistant Usage
At the moment, only a CLI interface and limited functionality is available.
Usage is simple. Just follow these steps:
Run "preupg -l" command - it lists all available contents for preupgrade-assistant (as the system is based on a plugin, there may be modules from different sources in the future). If nothing is shown, install the preupgrade-assistant-contents package. If you have CentOS6_7 content available, run the command preupg -s CentOS6_7
"preupg -l"コマンドでプリアップグレードアシスタントが利用可能なコンテンツ一覧が表示されます。その後あなたがCentOS6.7を使っているなら"preupg -s CentOS6_7"と実行しましょう。
$ preupg -l
CentOS6_7
当たり前だけど6.8は出てこないね。"preupg -s CentOS6_8"と無理やりやってみましょうか。
$ preupg -s CentOS6_8
Preupg tool doesn't do the actual upgrade.
Please ensure you have backed up your system and/or data in the event of a failed upgrade
 that would require a full re-install of the system from installation media.
Do you want to continue? y/n

y

Specify correct upgrade path parameter like -s RHEL6_7
Upgrade path is provided by command preupg --list
$ preupg --list
CentOS6_7
だめ。じゃ6_7で。
$ preupg -s CentOS6_7
Preupg tool doesn't do the actual upgrade.
Please ensure you have backed up your system and/or data in the event of a failed upgrade
 that would require a full re-install of the system from installation media.
Do you want to continue? y/n
y
Gathering logs used by preupgrade assistant:
All installed packages : 01/11 ...finished (time 00:10s)
All changed files      : 02/11 ...finished (time 10:42s)
Changed config files   : 03/11 ...finished (time 00:00s)
All users              : 04/11 ...finished (time 00:00s)
All groups             : 05/11 ...finished (time 00:00s)
Service statuses       : 06/11 ...finished (time 00:00s)
All installed files    : 07/11 ...finished (time 00:07s)
All local files        : 08/11 ...finished (time 00:24s)
All executable files   : 09/11 ...finished (time 00:08s)
RedHat signed packages : 10/11 ...finished (time 00:00s)
CentOS signed packages : 11/11 ...finished (time 00:00s)
Assessment of the system, running checks / SCE scripts:
001/096 ...done    (Configuration Files to Review)
002/096 ...done    (File Lists for Manual Migration)
003/096 ...done    (Bacula Backup Software)
004/096 ...done    (MySQL configuration)
 ~
094/096 ...done    (NIS server maps check)
095/096 ...done    (NIS server MAXUID and MAXGID limits check)
096/096 ...done    (NIS server config file back-up)
Assessment finished (time 09:47s)
I/O warning : failed to load external entity "/usr/share/openscap/xsl/security-guide.xsl"
compilation error: file /usr/share/preupgrade/xsl/preup.xsl line 40 element import
xsl:import : unable to load /usr/share/openscap/xsl/security-guide.xsl
I/O warning : failed to load external entity "/usr/share/openscap/xsl/oval-report.xsl"
compilation error: file /usr/share/preupgrade/xsl/preup.xsl line 41 element import
xsl:import : unable to load /usr/share/openscap/xsl/oval-report.xsl
I/O warning : failed to load external entity "/usr/share/openscap/xsl/sce-report.xsl"
compilation error: file /usr/share/preupgrade/xsl/preup.xsl line 42 element import
xsl:import : unable to load /usr/share/openscap/xsl/sce-report.xsl
OpenSCAP Error:: Could not parse XSLT file '/usr/share/preupgrade/xsl/preup.xsl' [oscapxml.c:416]
Unable to open file /root/preupgrade/result.html
Usage: preupg [options]

preupg: error: [Errno 2] No such file or directory: '/root/preupgrade/result.html'
だめですね。
諦めて 6.7 からアップデートしましょう。

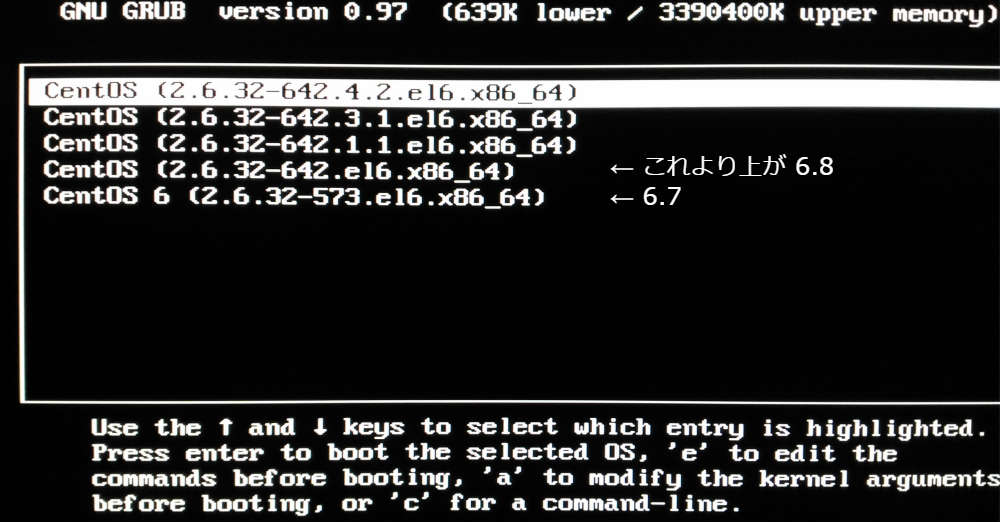
ちゃんと 6.7 が開けてるんでしょうかね。
$ cat /etc/redhat-release
CentOS release 6.8 (Final)
あれー。
$ cat /proc/version
Linux version 2.6.32-573.el6.x86_64 (mockbuild@c6b9.bsys.dev.centos.org) (gcc version 4.4.7 20120313 (Red Hat 4.4.7-16) (GCC) ) #1 SMP Thu Jul 23 15:44:03 UTC 2015
まあこっちで見ると正しく 2.6.32-573 になってるからいいか。再度挑戦。
$ preupg -l
CentOS6_7
$ preupg -s CentOS6_7
Preupg tool doesn't do the actual upgrade.
Please ensure you have backed up your system and/or data in the event of a failed upgrade
 that would require a full re-install of the system from installation media.
Do you want to continue? y/n
y
Gathering logs used by preupgrade assistant:
All installed packages : 01/11 ...finished (time 00:02s)
All changed files      : 02/11 ...finished (time 10:26s)
Changed config files   : 03/11 ...finished (time 00:00s)
All users              : 04/11 ...finished (time 00:00s)
All groups             : 05/11 ...finished (time 00:00s)
Service statuses       : 06/11 ...finished (time 00:00s)
All installed files    : 07/11 ...finished (time 00:07s)
All local files        : 08/11 ...finished (time 00:25s)
All executable files   : 09/11 ...finished (time 00:09s)
RedHat signed packages : 10/11 ...finished (time 00:00s)
CentOS signed packages : 11/11 ...finished (time 00:00s)
Assessment of the system, running checks / SCE scripts:
001/096 ...done    (Configuration Files to Review)
002/096 ...done    (File Lists for Manual Migration)
~
085/096 ...done    (Python 2.7.5)
086/096 ...done    (Ruby 2.0.0)
087/096 ...done    (SCL collections)
088/096 ...done    (System kickstart)
089/096 ...done    (YUM)
090/096 ...done    (Check for usage of dangerous range of UID/GIDs)
091/096 ...done    (Incorrect usage of reserved UID/GIDs)
092/096 ...done    (NIS ypbind config files back-up)
093/096 ...done    (NIS Makefile back-up)
094/096 ...done    (NIS server maps check)
095/096 ...done    (NIS server MAXUID and MAXGID limits check)
096/096 ...done    (NIS server config file back-up)
Assessment finished (time 10:08s)
I/O warning : failed to load external entity "/usr/share/openscap/xsl/security-guide.xsl"
compilation error: file /usr/share/preupgrade/xsl/preup.xsl line 40 element import
xsl:import : unable to load /usr/share/openscap/xsl/security-guide.xsl
I/O warning : failed to load external entity "/usr/share/openscap/xsl/oval-report.xsl"
compilation error: file /usr/share/preupgrade/xsl/preup.xsl line 41 element import
xsl:import : unable to load /usr/share/openscap/xsl/oval-report.xsl
I/O warning : failed to load external entity "/usr/share/openscap/xsl/sce-report.xsl"
compilation error: file /usr/share/preupgrade/xsl/preup.xsl line 42 element import
xsl:import : unable to load /usr/share/openscap/xsl/sce-report.xsl
OpenSCAP Error:: Could not parse XSLT file '/usr/share/preupgrade/xsl/preup.xsl' [oscapxml.c:416]
Unable to open file /root/preupgrade/result.html
Usage: preupg [options]

preupg: error: [Errno 2] No such file or directory: '/root/preupgrade/result.html'
ダメ。
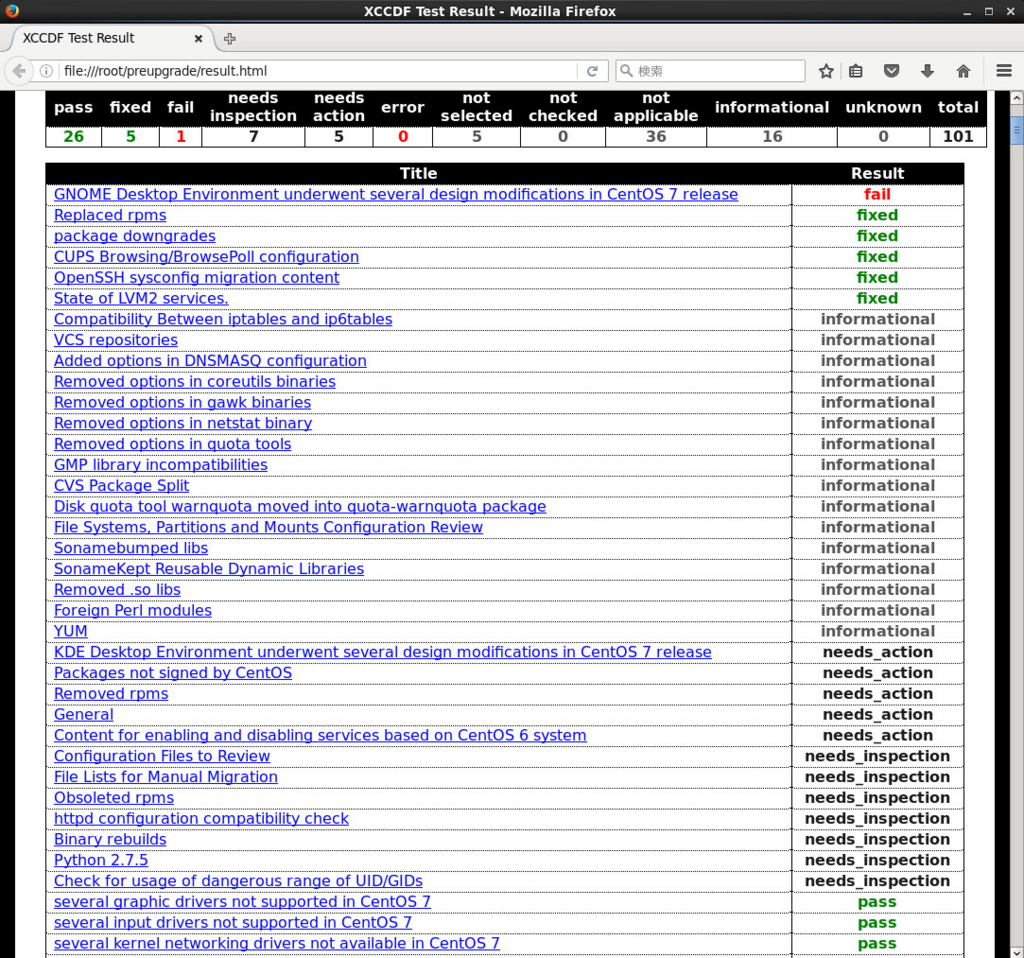
result.htmlが生成されたらいろいろ分かるんだろうけど、生成されない。
I/O warning : failed to load external entity "/usr/share/openscap/xsl/security-guide.xsl"
で、ファイル読み込み失敗してる。/usr/share/openscap/xsl/を見たらその名前のファイルはないのでそりゃあ文句言われるよ。
$ rpm -qa | grep openscap
openscap-1.2.8-2.el6.centos.x86_64
OpenSCAPは入ってることは入ってるが……。
redhat - preupg: error: No such file or directory: '/usr/share/preupgrade/README' - Stack Overflow
Bug 1304772 – report generation is broken (openscap rebased)
https://rhn.redhat.com/errata/RHBA-2016-1022.html
- To remain compatible with the most recent Red Hat Enterprise Linux version of OpenSCAP, preupgrade-assistant has been updated to reflect the latest XSLT files in use. (BZ#1304772)
分からない…。素直にクリーンインストールした方がいいか。 確かにこれでアップデートできても、6→7で大きく変わってて整合性取らせるために後でYumやらGRUBやらいろいろ再設定しなくちゃいけないみたいですごく面倒くさそう。
https://wiki.centos.org/Manuals/ReleaseNotes/CentOS6.8/Japanese
7.1. 上位ベンダーにあるパッケージで、CentOS が変更したパッケージ openscap
$ rpm -q --changelog openscap | head -n 20
* 火  5月 10 2016 Johnny Hughes <johnny@centos.org> - 1.2.8-2
- add centos to oval defines

* 木  1月 28 2016 Šimon Lukašík <slukasik@redhat.com> - 1.2.8-2
- patch oscap-vm to support Red Hat Enterprise Linux 6

* 月  1月 18 2016 Šimon Lukašík <slukasik@redhat.com> - 1.2.8-1
- upgrade to the latest upstream release
- Report failures on non-utf8 systems (#1285757)

* 金 12月 04 2015 Šimon Lukašík <slukasik@redhat.com> - 1.2.7-1
- upgrade to the latest upstream release (#1259037)
- Introduced '--verbose' mode (#1287295)
- Detailed OVAL results present in HTML report (#1140240)
- fixed issues in scap-as-rpm tool (#1226398, #1258958)
- introduced support for non-decimal OVAL vetsions (#1248378)
- 'oscap oval eval --report' command (#1258958)
- 'oscap xccdf generate --profile <custom-profile> guide' (#1139822)

* 月  2月 16 2015 Šimon Lukašík <slukasik@redhat.com> - 1.0.10-2
http://ftp.riken.jp/Linux/centos/6.8/os/x86_64/Packages/
openscap-1.2.8-2.el6.centos.x86_64.rpm
http://ftp.riken.jp/Linux/centos/7.2.1511/os/x86_64/Packages/
openscap-1.2.5-3.el7.x86_64.rpm
やっぱり「幾つかのシステムクリティカルなパッケージにおいて、CentOS7よりCentOS6.7の方がバージョンが高いものがあり、そのためアップグレードはうまくいきません。」てことかな。
古いやつ入れたらいけるんだろうか。面倒だ。クリーンインストールしよう。
★追記:コメントで「OpenSCAPのバージョンダウンでエラーはなくなりました」と教えてもらえたので試してみました。
$ rpm -qa | grep openscap
openscap-1.2.8-2.el6.centos.x86_64

# rpm -Uhv --oldpackage http://dev.centos.org/centos/6/upg/x86_64/Packages/openscap-1.0.8-1.0.1.el6.centos.x86_64.rpm
http://dev.centos.org/centos/6/upg/x86_64/Packages/openscap-1.0.8-1.0.1.el6.centos.x86_64.rpm を取得中
準備中...                ########################################### [100%]
   1:openscap               ########################################### [100%]

$ rpm -qa | grep openscap
openscap-1.0.8-1.0.1.el6.centos.x86_64
再挑戦
# preupg -s CentOS6_7
Preupg tool doesn't do the actual upgrade.
Please ensure you have backed up your system and/or data in the event of a failed upgrade
 that would require a full re-install of the system from installation media.
Do you want to continue? y/n

y

Gathering logs used by preupgrade assistant:
All installed packages : 01/11 ...finished (time 00:01s)
All changed files      : 02/11 ...finished (time 04:41s)
Changed config files   : 03/11 ...finished (time 00:00s)
~
095/096 ...done    (NIS server MAXUID and MAXGID limits check)
096/096 ...done    (NIS server config file back-up)
Assessment finished (time 03:21s)
Result table with checks and their results for main contents:
---------------------------------------------------------------
|Bacula Backup Software    |notapplicable |
|MySQL configuration    |notapplicable |
~
|Content for enabling and disabling services based on CentOS 6 system    |needs_action |
|GNOME Desktop Environment underwent several design modifications in CentOS 7 release      |fail |
-----------------------------------------------------------------------------
Tarball with results is stored here /root/preupgrade-results/preupg_results-161107213059.tar.gz .
The latest assessment is stored in directory /root/preupgrade .
Summary information:
We found some critical issues. In-place upgrade is not advised.
Read the file /root/preupgrade/result.html for more details.
Upload results to UI by command:
e.g. preupg -u http://127.0.0.1:8099/submit/ -r /root/preupgrade-results/preupg_results-*.tar.gz .
メールが /var/spool/mail/root にあります
いけてそうですね。あ、PreUpgradeの名の通りここまでが「アップグレードの前準備」なのか。
 事前検査の結果が保存されていますので、これを見て必要な措置を行います、が…やっぱりいろいろ面倒だし私には良く分からない部分も多い……。GnomeDesktopのパッケージが大きく変わるからうまく動かないよ、とか外部リポジトリとかからインストールされたパッケージはうまくアップグレードできないよ、とか署名がうんぬんとか、まあ放っておいてもなんとかなりそうな物が多いけど。
とりあえず私のCentOS6.8はただのテスト環境なので、事前警告は無視して("FAIL"のGNOME DesktopだけアンインストールしてCUIで)実際にアップグレードに進んでみます。 https://wiki.centos.org/TipsAndTricks/CentOSUpgradeTool
7.How to Upgrade After Reviewing the Results
Once you are ready to upgrade (you have mitigated all issues you care to mitigate, etc.), you first need to import the CentOS-7 RPM key with this command:rpm --import http://mirror.centos.org/centos/RPM-GPG-KEY-CentOS-7 Then run the following command to upgrade:
centos-upgrade-tool-cli --network 7 --instrepo=http://mirror.centos.org/centos/7/os/x86_64/ Then reboot.
8.Known Issues When Upgrading
続きはのちほど。